
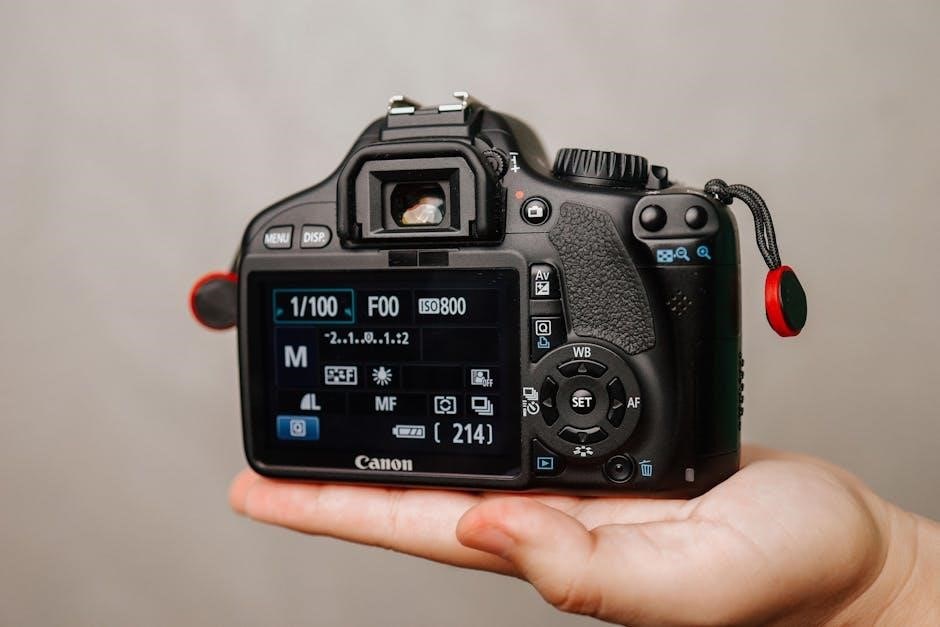
The Canon EOS 60D is a mid-range DSLR camera released in 2010, featuring an 18MP APS-C sensor, vari-angle LCD, and HD video recording. It balances performance and affordability, making it ideal for enthusiast photographers seeking advanced controls and creative flexibility.
Key Features and Specifications
The Canon EOS 60D is equipped with an 18.0-megapixel APS-C CMOS sensor, delivering high-quality images with rich detail. It features a 3-inch vari-angle LCD screen, allowing for flexible shooting angles and convenient video recording. The camera supports Full HD (1080p) video capture at 24p, 25p, and 30p frame rates, making it suitable for both still photography and filmmaking.
The EOS 60D is powered by Canon’s DIGIC 4 image processor, ensuring fast and efficient image processing. It offers a wide ISO range of 100-6400, expandable to 12800 for low-light shooting. The camera features a 9-point AF system with one cross-type sensor for precise autofocus performance. Additionally, it supports continuous shooting at up to 5.3 frames per second, ideal for capturing dynamic subjects.
The EOS 60D is compatible with Canon’s EF and EF-S lenses, offering versatility in lens selection. It also supports wireless flash control and features a built-in flash for added lighting options. The camera’s weather-sealed design ensures durability, while its lightweight magnesium alloy and polycarbonate construction make it comfortable to carry. With SDXC card compatibility and in-camera RAW image processing, the EOS 60D is a versatile tool for photographers seeking advanced functionality.
Initial Setup and Configuration
Setting up the Canon EOS 60D involves several key steps to ensure optimal performance. Begin by charging the battery fully and inserting it correctly into the camera. Next, install a compatible memory card (SD, SDHC, or SDXC) and format it within the camera to prepare for use.
Set the date, time, and language through the camera’s menu system. Adjust the viewfinder diopter for sharp viewing and calibrate the LCD screen brightness for accurate image review. Familiarize yourself with default settings and customize them as needed for personal preference or specific shooting requirements.
Reset factory defaults if transferring the camera to ensure a clean slate for the next user. Backup important data on memory cards before formatting. Consider calibrating the battery by charging and discharging it fully a few times for accurate battery life indicators.
Finally, explore additional configuration options like shooting modes and custom settings to tailor the camera to your needs. This comprehensive setup ensures the EOS 60D is ready for use, providing a seamless photography experience.
Shooting Modes Explained
The Canon EOS 60D offers a variety of shooting modes tailored to different photography scenarios and skill levels. The mode dial provides quick access to settings like Scene Intelligent Auto, Creative Auto, and manual modes.
- Scene Intelligent Auto: Automatically adjusts settings for optimal results in various conditions, ideal for beginners.
- Creative Auto: Allows basic adjustments like background blur and brightness while maintaining ease of use.
- Program AE: The camera selects aperture and shutter speed, but users can adjust settings for creative control.
- Aperture Priority (Av): User sets aperture; camera adjusts shutter speed for depth of field control.
- Shutter Priority (Tv): User sets shutter speed; camera adjusts aperture for freezing or blurring motion.
- Manual (M): Full control over aperture, shutter speed, and ISO for experienced photographers.
- Bulb (B): For long exposures, controlled by the user with the shutter button.
- Custom Modes (C1, C2, C3): Save personalized settings for quick access.
These modes cater to both casual and advanced shooters, offering flexibility and precision for capturing diverse subjects and styles.
Autofocus System
The Canon EOS 60D features a robust autofocus system designed to deliver precise and fast focus acquisition. Equipped with a 9-point AF system, including a high-precision cross-type center point, the camera excels in various shooting conditions. The AF points are spread across the frame, allowing for accurate subject tracking and composition flexibility.
- One-Shot AF: Ideal for stationary subjects, this mode locks focus once the subject is detected.
- AI Servo AF: Continuous focus tracking for moving subjects, perfect for sports and wildlife photography.
- AI Focus AF: Automatically switches between One-Shot and AI Servo AF based on subject movement.
Users can manually select AF points using the camera’s directional pad or allow the camera to automatically select points. The AF system also supports custom settings, enabling photographers to tailor focus behavior to their preferences. This versatility ensures the EOS 60D performs well in both still and dynamic shooting environments.
Metering Modes
The Canon EOS 60D offers four metering modes to ensure accurate exposure in various lighting conditions. These modes analyze light intensity and distribute it across the image to achieve optimal results.
- Evaluative Metering: The default mode, it analyzes multiple zones and adjusts exposure based on the scene’s brightness, color, and subject distance, ideal for most shooting situations.
- Center-Weighted Average Metering: Focuses on the central area of the frame, with more emphasis on the center, making it suitable for portraits and balanced lighting scenarios.
- Spot Metering: Measures light from a small, selectable area (about 2.8% of the viewfinder), useful for capturing high-contrast subjects or precise exposure control.
- Partial Metering: Similar to spot metering but covers a larger area (about 9.1% of the viewfinder), offering a balance between precision and flexibility.
These modes can be selected via the camera’s menu or custom buttons, allowing photographers to adapt to changing lighting conditions efficiently. Custom settings further enhance metering accuracy, catering to specific shooting styles and preferences.
ISO Settings
The Canon EOS 60D offers a range of ISO settings to cater to different lighting conditions. ISO sensitivity determines how much light the camera’s sensor captures, allowing for better exposure control in both bright and low-light environments.
- Standard ISO Range: The EOS 60D features a standard ISO range of 100 to 6400, suitable for most shooting scenarios. This range ensures minimal noise while maintaining image clarity.
- Expanded ISO Range: For extreme low-light conditions, the camera can be set to ISO 12800 (H) mode, though this may introduce more noise in the images.
- Auto ISO: The Auto ISO feature allows the camera to automatically adjust the sensitivity based on the scene, providing convenience for beginners or when shooting in changing lighting conditions.
- Customization: Users can set a maximum ISO limit in Auto mode, ensuring that noise levels remain within acceptable limits while maintaining proper exposure.
Adjusting ISO settings on the EOS 60D is straightforward, accessible via the Quick Control Dial or the camera’s menu. Proper use of ISO settings helps balance image quality and exposure, making it a crucial tool for photographers of all skill levels. Always refer to the manual for detailed customization options.
White Balance Options
The Canon EOS 60D offers multiple White Balance options to ensure accurate color representation. Choose from Auto, Daylight, Shade, Tungsten, Fluorescent, or Flash settings. Custom White Balance allows for precise calibration based on specific lighting conditions, enhancing image accuracy and control.
- Auto White Balance: Automatically adjusts based on the scene.
- Preset Modes: Includes Daylight, Shade, Tungsten, Fluorescent, and Flash.
- Custom White Balance: Set a specific white balance manually using a reference object;
These options enable photographers to capture true-to-life colors in various environments, ensuring professional-quality results. Refer to the manual for detailed steps on selecting and customizing White Balance settings.
Customizing Camera Buttons
The Canon EOS 60D allows users to customize camera buttons to suit their shooting style, enhancing efficiency and personalization. Through the Custom Functions menu, photographers can assign specific functions to buttons like the Multi-Controller or the Quick Control Dial. This feature enables quick access to frequently used settings such as ISO, AF modes, or White Balance, streamlining the workflow during shoots.
Key buttons that can be customized include the Multi-Controller, which can be set to adjust exposure compensation or flash exposure compensation. Additionally, the Quick Control Dial can be programmed to control ISO or metering modes directly. This level of customization ensures that the camera adapts to the photographer’s preferences, making it easier to focus on creativity rather than navigating menus.
While the customization options are extensive, certain buttons like the shutter release and video recording button cannot be reconfigured. The EOS 60D’s button customization is a powerful tool for professionals and enthusiasts alike, allowing for a more intuitive and tailored shooting experience. Refer to the manual for detailed steps on assigning custom functions to specific buttons.
Using the Built-In Flash
The Canon EOS 60D is equipped with a built-in flash, a convenient feature for illuminating subjects in low-light conditions. The flash automatically pops up when the camera detects insufficient light and can also be manually activated. It offers multiple modes, including E-TTL II (Evaluative Through-The-Lens) metering for accurate exposure and Manual mode for precise control over flash output.
To use the built-in flash, ensure it is raised and configured via the camera’s menu. The Flash Exposure Compensation feature allows adjustments to the flash output, preventing overexposure or underexposure. Additionally, the flash can be used in conjunction with external Speedlite units for more advanced lighting setups.
When using the built-in flash, it’s important to note the camera’s sync speed, which is limited to 1/250th of a second or slower. The flash also supports second-curtain sync, creating creative effects with moving subjects. Always ensure the flash is fully charged before shooting and avoid pointing it directly at reflective surfaces to minimize glare. By mastering the built-in flash, photographers can enhance their images in a variety of lighting scenarios.
Understanding Memory Card Formats
The Canon EOS 60D supports various memory card formats to store images and video. It is compatible with SD, SDHC, and SDXC cards, each offering different storage capacities. SDHC cards are ideal for everyday use, supporting up to 32GB, while SDXC cards are designed for larger storage needs, capable of holding up to 2TB. When selecting a card, consider the file sizes of your images and the length of video recordings to ensure sufficient storage. The EOS 60D also supports UHS-I cards for faster data transfer speeds, which is beneficial for capturing high-speed burst shots or recording HD video.
Before using a new memory card, format it in the camera to ensure compatibility and optimal performance. Formatting a card in the EOS 60D erases all data, so always transfer important files to a computer or external storage device first. Using multiple memory cards can help organize your files and prevent data loss. Always handle memory cards with care to avoid damage and ensure reliable performance. By choosing the right memory card format and managing your storage effectively, you can enhance your photography workflow with the EOS 60D.
Resolving Common Error Messages
When using the Canon EOS 60D, you may encounter error messages that require attention. One common error is “Error 99”, which can occur due to issues like faulty memory cards, lens problems, or improper camera settings. To resolve this, try removing and reinserting the memory card, cleaning the lens contacts, or resetting the camera to its default settings. Another frequent error is “Card Error”, which indicates a problem with the memory card. This can often be fixed by formatting the card in the camera or replacing it if it’s damaged.
If you see “Low Battery” or “Battery Exhausted”, ensure your battery is fully charged or replace it with a fully charged one. For errors related to the lens, such as “Communication Error”, clean the lens contacts and ensure it is properly mounted. If issues persist, consult the Canon EOS 60D operating manual or visit Canon’s official support website for troubleshooting guides. Regularly updating firmware and maintaining your camera can help prevent errors and ensure smooth operation. Always handle your camera and accessories with care to minimize the risk of errors and extend its lifespan.
Best Practices for Sensor Cleaning
Keeping the Canon EOS 60D’s image sensor clean is essential for maintaining optimal image quality. Turn on the Auto Cleaning feature in the menu to allow the camera to shake off dust automatically. For manual cleaning, use the Manual Sensor Cleaning option, which locks the mirror and exposes the sensor. Always use a fully charged battery or connect the camera to a power source during manual cleaning to prevent sudden shutdowns.
Use a soft-bristled brush or a handheld bulb blower to gently remove dust. Avoid touching the sensor with your fingers or using household cleaners, as they can damage the sensor. For stubborn spots, use a swab specifically designed for camera sensors, dampened with distilled water. Inspect the sensor regularly using the Sensor Cleaning or Live View mode. If you’re unsure about cleaning, consult a professional to avoid damage. Regular cleaning ensures your photos remain free from dust and debris, preserving the 60D’s 18MP image quality.
Organizing Images with Folders
Organizing your images with folders on the Canon EOS 60D is an efficient way to manage your photos. The camera allows you to create and customize folders on the memory card, ensuring your files are neatly categorized. Use the Menu to navigate to the Setup tab and select Folder settings. You can create new folders or rename existing ones to suit your needs, such as organizing by date, event, or subject.
When downloading images to your computer, maintain this structure by creating matching folders. Use clear, descriptive names for folders, such as “2023_Vacation” or “Wedding_2024.” Avoid overly complex folder structures to keep your workflow streamlined. For added organization, use third-party software like Adobe Lightroom or Canon’s Digital Photo Professional to sort and tag your images further. Regularly backing up your folders to an external drive or cloud storage ensures your photos are safe. By organizing your images effectively, you can quickly locate specific shots and maintain a professional workflow. This system is especially useful for photographers who work with large collections of images.